The DJI Air 3 isn’t just a drone; it’s a flying film studio packed with cutting-edge video capabilities. But to truly harness its potential, you need to master its camera settings. The right settings can transform your aerial footage from ordinary to extraordinary, capturing stunning landscapes, breathtaking action shots, and cinematic masterpieces.
Briefing: Your Go-To Video Settings
- ISO: 100 (Keep it as low as possible for the cleanest image)
- Frame Rate: 24/30 FPS (24 fps for a cinematic look, 30 fps for smoother motion)
- Shutter Speed: 1/50 or 1/60 (Follow the 180-degree shutter rule)
- White Balance: Manual (Adjust to match the lighting conditions)
- Color Profile: D-Log M (10-bit color) for maximum dynamic range
- Codec: H.265 for efficient compression and higher quality
- Video Format: MP4 for wide compatibility
- Resolution: 4K for maximum detail
Pro Mode (Videos)
Just like a DSLR or mirrorless camera, the Air 3 has various settings that can be manually changed to your liking to achieve the best and most professional photos and cinematic video footage. To achieve this, it’s essential to get out of Auto/Automatic settings and into DJI’s Manual camera settings, referred to as Pro mode.
To get to Pro mode when shooting video:
- While in video mode, tap the camera icon on the bottom right of the DJI Fly app live view screen.
- If the video settings are currently set to Auto, tapping the camera icon will change the mode to Pro.
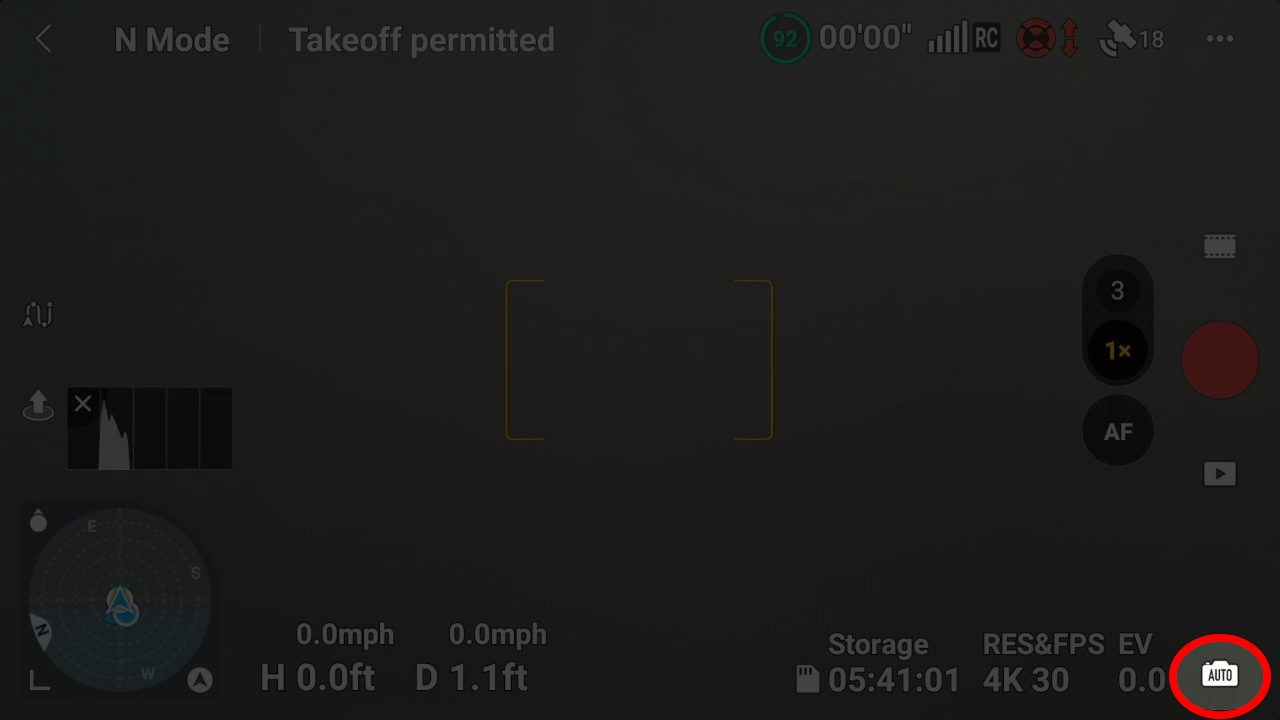
AUTO Mode
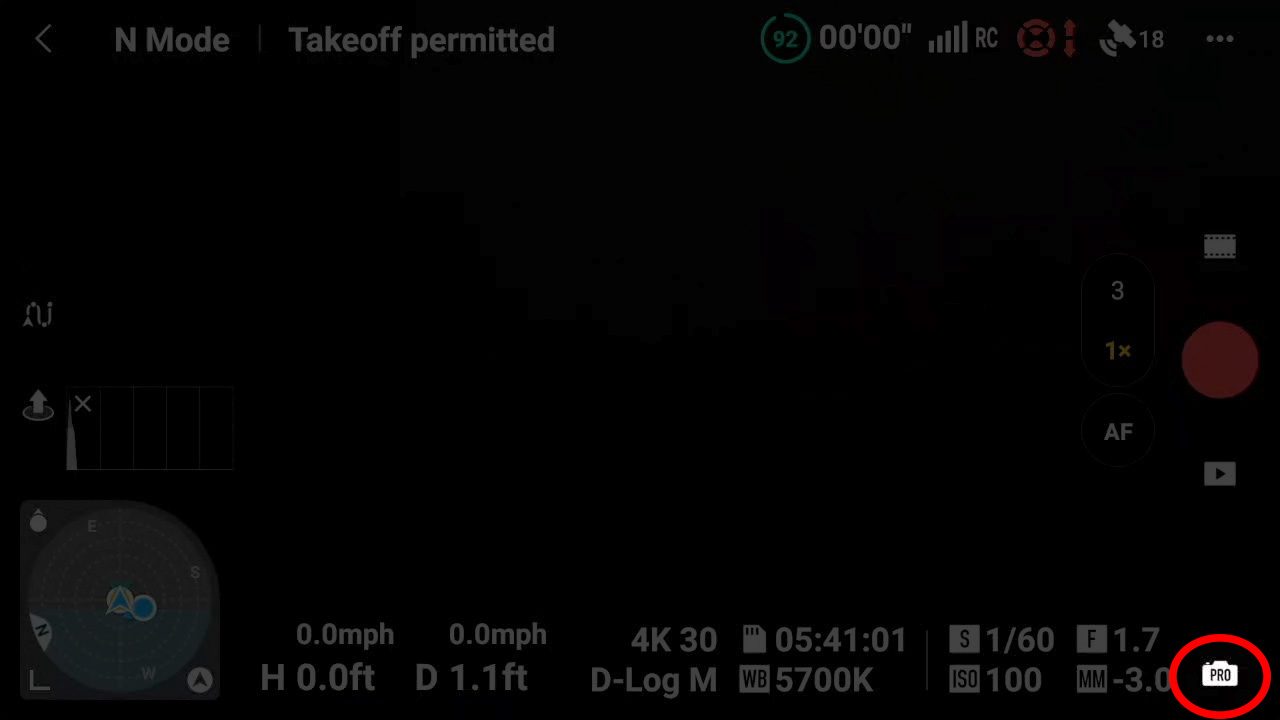
PRO Mode
Aperture
Here’s a quick word about the aperture on the Air 3. The Air 3’s dual camera system utilizes two separate apertures for the cameras. The 24mm wide-angle camera has a fixed aperture of f/1.7, whereas the 70mm tele camera has an aperture of f/2.8.
Can the aperture on the Air 3’s cameras be adjusted? No. Unlike the cameras on the professional-level Mavic 3 Series, the aperture on both of the Air 3 cameras is fixed, so they cannot be adjusted to aid in properly exposing shots or changing the depth of field.
ISO
ISO controls the camera’s sensitivity to light. A lower ISO like 100 is ideal for well-lit conditions, producing the cleanest footage with minimal noise. In low-light situations, you might need to increase the ISO, but remember that higher values introduce more grain or noise into your video.
To change the ISO when shooting video:
- Tap “ISO” on the Pro Settings screen.
- Use the slider to choose the desired ISO value.
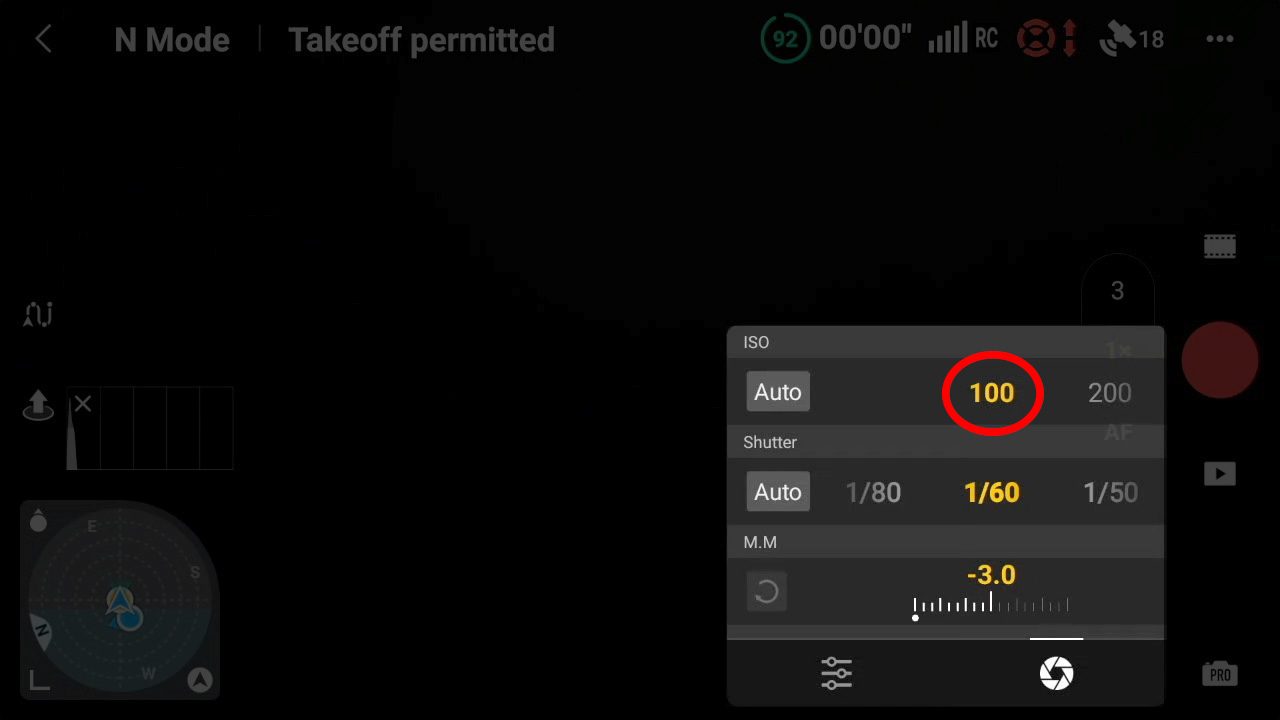
Manual ISO Setting
Color Profiles: Unleashing the Power of 10-Bit Color
The Air 3 offers three color profiles: Normal, HLG, and D-Log M. The Normal profile is 8-bit, while HLG and D-Log M are both 10-bit.
- 8-bit vs. 10-bit: Color depth refers to the amount of color and variety of shades a camera can record. 8-bit video can display a little over 16 million colors, while 10-bit video offers over 1 billion colors. This massive increase in color information results in smoother gradients, more realistic colors, and greater flexibility for color grading in post-production.
- D-Log M: This is a “flat” color profile that captures a wider dynamic range, preserving more details in both shadows and highlights. While it might look dull straight out of the camera, it provides a wealth of information for color grading, allowing you to create stunningly cinematic looks.
- HLG (Hybrid Log-Gamma): This is another 10-bit color profile designed for High Dynamic Range (HDR) content. It’s particularly well-suited for live broadcasts and content intended for direct playback on HDR displays. HLG offers a wider range of brightness levels, resulting in more vibrant and lifelike visuals.
For the best video quality, we recommend shooting in one of the 10-bit color profiles, either HLG or D-Log M. If you’re unsure which one to choose, D-Log M is generally a safe bet for its versatility in post-production. However, if you’re creating content specifically for HDR displays or live broadcasts, HLG might be the better choice.
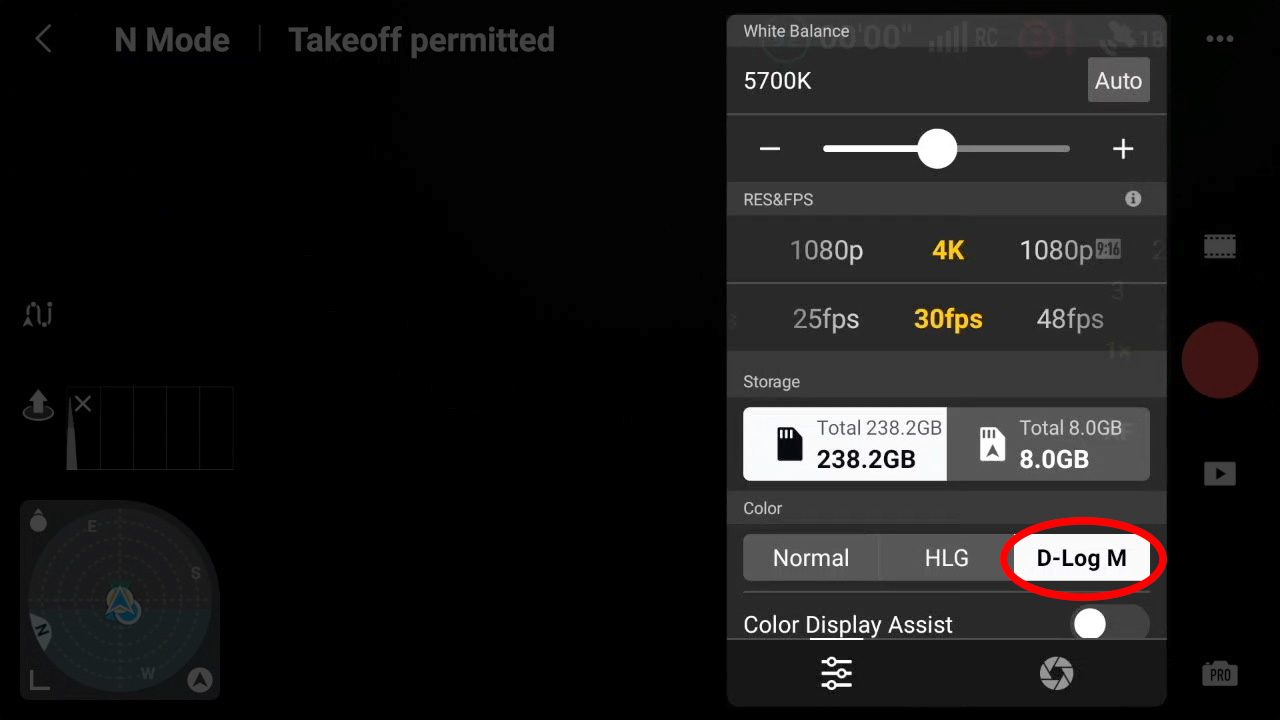
Manually Set D-Log M Color Profile
Codecs: H.264 vs. H.265
Codecs are algorithms that compress your video files, making them smaller and easier to store and share. The Air 3 offers two codecs: H.264 and H.265.
- H.264: This is an older codec that is widely supported by various devices and software. It offers good compression but may not be as efficient as H.265.
- H.265 (HEVC): This is a newer codec that offers superior compression efficiency, meaning you can achieve higher quality video with smaller file sizes. However, it requires more processing power to encode and decode, and may not be supported by older devices or software.
For the Air 3, we recommend using the H.265 codec. While it may require a bit more processing power in post-production, the benefits of smaller file sizes and higher quality video outweigh the drawbacks.
When the D-Log M color profile is used the codec is automatically set to H.265 and cannot be changed.
Frame Rate: Choosing the Right Balance
Frame rate refers to the number of individual frames captured per second. For drone footage, frame rate isn’t as critical as for ground cameras because drones generally film scenes from a distance. This means you can usually get away with lower frame rates without sacrificing the perception of smooth motion.
The recommended frame rates for the DJI Air 3 are 24 fps and 30 fps.
- 24 fps: Offers a more cinematic look with subtle motion blur, mimicking the look of traditional film.
- 30 fps: Delivers smoother motion, making it suitable for fast-paced action or scenes with lots of movement.
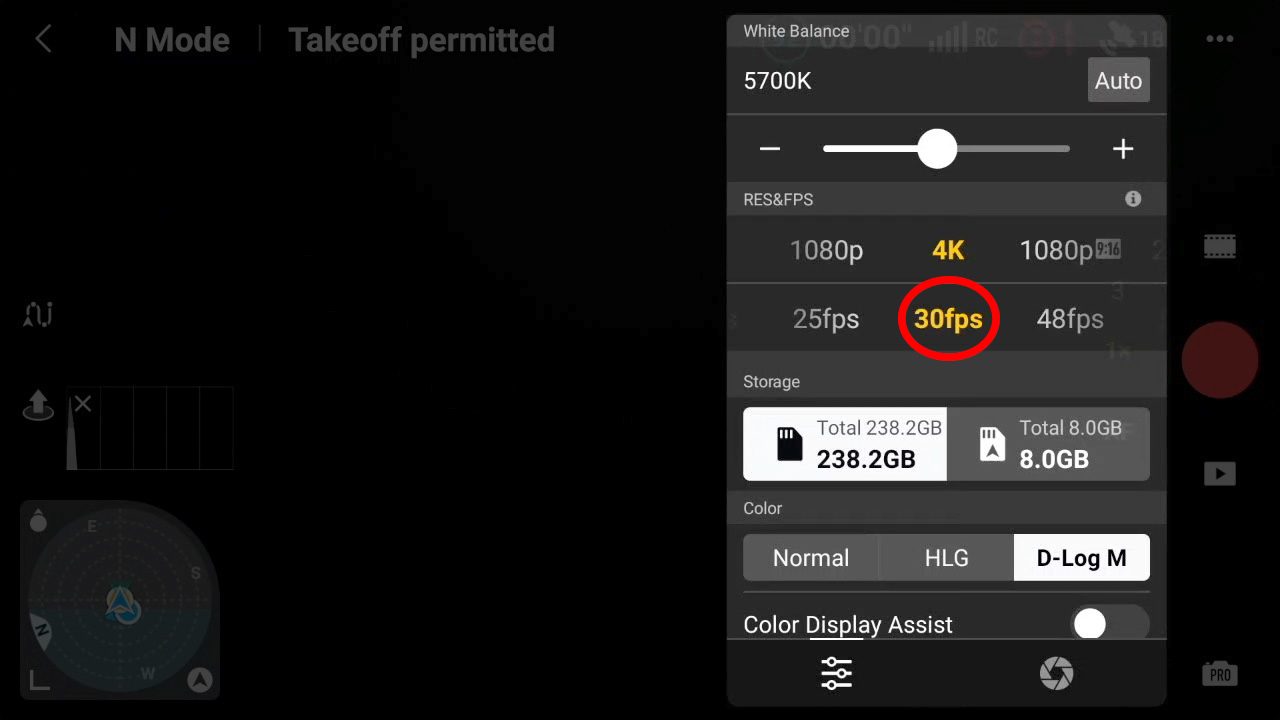
Manually Setting the Frame Rate to 30fps
Slow Motion Footage
The Air 3 has upped the ante by offering 4K video at 100 fps as standard. For even more dramatic slow-motion, it can shoot 2.7K video at 200 fps.
If you’re planning to incorporate slow-motion footage into a 24 fps timeline, shooting at 60 fps or 100 fps will provide ample flexibility. These frame rates are excellent for capturing close-up views of running water, fast-moving boats, or even people and animals in motion.
When editing, you can slow down 60 fps footage to 40% speed on a 24 fps timeline, while 100 fps footage can be slowed down to 24 fps. For those ultra-slow-motion shots, the Air 3’s 200 fps capability will provide stunning results.
Frame Rate and Resolution Tips
- 24 fps: When shooting in 24 frames per second, you will need to be very smooth on the control sticks to avoid jerky flight movement showing up in the footage.
- 30 fps: The benefit of shooting in 30 frames per second and slightly slowing the footage down is that the footage is then smoothed out.
- Resolution: To get the best video quality, you’ll want to set your Air 3 to record in 4K resolution if you are planning on shooting footage between the 24 fps and 100 fps range. If shooting at 200 fps, the Air 3 will drop down to 2.7K resolution.
Understanding the 180-Degree Shutter Rule
The 180-degree shutter rule is a guideline in filmmaking and videography that helps create natural-looking motion blur. It suggests that your shutter speed should be double your frame rate. For example, if you’re shooting at 24 fps, your shutter speed should be 1/50 (or as close as your camera allows).
Why does this matter? Our eyes perceive motion blur, and adhering to the 180-degree shutter rule mimics this natural phenomenon, resulting in smoother, more cinematic footage.
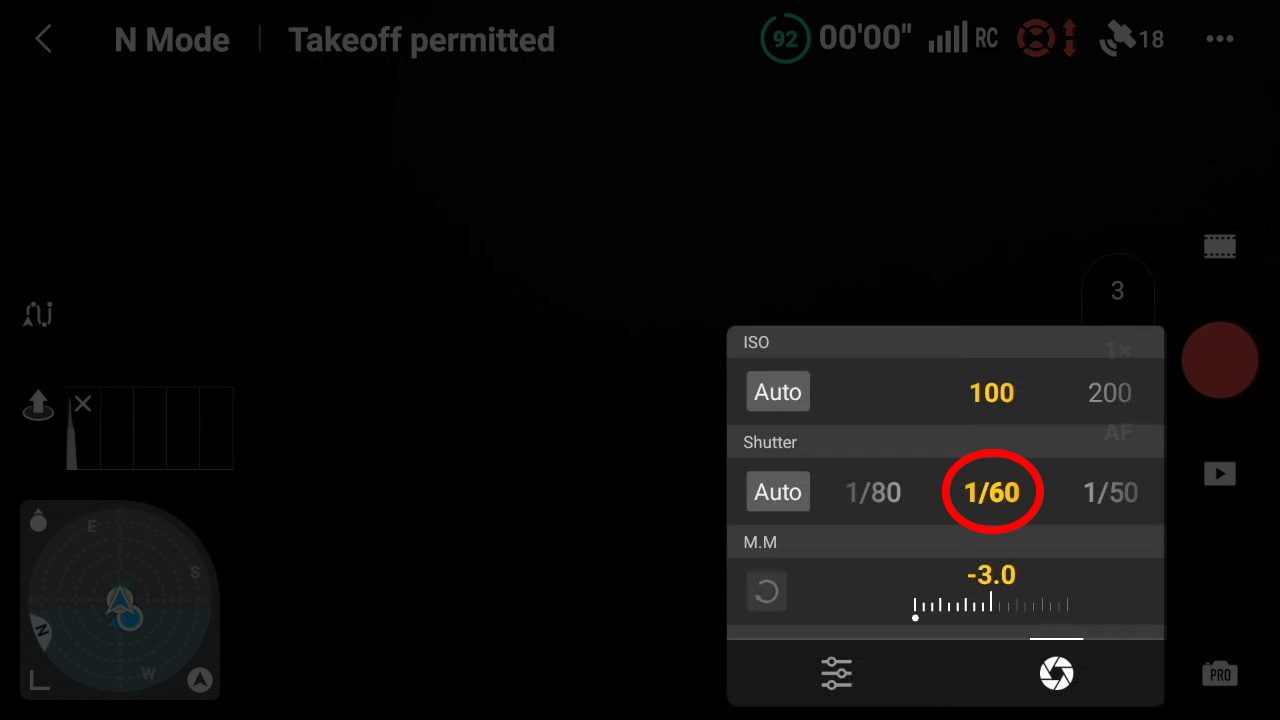
Manually Setting Shutter Speed to 1/60 sec (double the frame rate of 30fps)
ND Filters: Essential Tools for Controlling Exposure
ND filters, or neutral density filters, are like sunglasses for your camera. They reduce the amount of light entering the lens, allowing you to maintain proper exposure without sacrificing your desired shutter speed and aperture settings.
ND filters are particularly important for drone videography, as you often have limited control over your aperture (which is fixed on the Air 3) and shutter speed (which should adhere to the 180-degree rule for natural motion blur). ND filters give you the flexibility to balance your exposure in bright conditions, preventing overexposed footage and enabling you to shoot with slower shutter speeds for more cinematic results.

